1. Installere Ubuntu
2. Opdatere systemet
3. Hente og installere programmer
4. Teste TV-modtagelse
5. Scanne TV-kanaler
6. Installere Mythtv-pakken
7. Ændre password for brugeren mythtv og tildele rettigheder
8. Hente TV-lister fra nettet med XMLTV
9. Køre mythtv-setup
Mythtv. Drømmen om den ultimative Medieserver for TV, DVD, mp3 og billeder. Jeg hader det egentligt med en stor passion. Det er en bitch hvis man ikke holder sig til en slavisk fremgangsmetode og det straffer hårdt hvis man improviserer for meget undervejs. Jeg må have re-installeret Mythtv mindst 100 gange igennem de sidste 4 år - uden at kunne sige at jeg har fået det til at virke fuldt ud. Det nøder mig dog stadigt at jeg ikke har kunnet knække nøden helt, så derfor prøver jeg endnu engang at få det til at spille, og denne gang vil jeg gå metodisk og struktureret til værks.
1. Installere Ubuntu
Hent en ISO fra http://www.ubuntu.com/getubuntu/download og lav en fuld standard desktop installation.
Vigtigt: Undlad at kalde din bruger for mythtv – det skaber bare problemer da mythtvinstallationen selv opretter en bruger med dette navn senere. Systemnavnet kan være hvad som helst – jeg vælger htpc.
2. Opdatere systemet
Før man går videre er det vigtigt at systemet er opdateret. Under Administration> Softwarekilder enabler man alle ekstra Ubuntu repositories:
main, universe, restricted og multiverse
Vælg en passende lokation at downloade fra under “source for your geographic location”.
Klik på Updates fanebladet> Vælg Important og Recommended updates> OK og quit. Hvis du får en pop-up med “Software updates available", udfør updates inden du fortsætter. Hvis ikke så gå til System> Administration> Synaptic Package Manager. Klik på Mark All Upgrades> Klik Apply.
For at have alle multimediaprogrammer og codecs inde er det smart at installere programmet Automatix, der – som navnet indikerer – gør det nemt at lave sig en multi media box.
Hent automatix: http://www.getautomatix.com/apt/dists/feisty/main/binary-i386/automatix2_1.1-4.5-7.04feisty_i386.deb
Vælge samtlige video og lyd drivers(codecs) og også gerne hvad der er af diverse medieafspillere.
3. Hente og installere programmer
De fleste ting som skal udføres under installationen skal gøres mens man er logget på som den standardbruger man oprettede under installationen. Lidt senere skal man så logge ind som mythtv bruger. For nu skal alle grundpakker ind, og her bruger vi kommandoen
Sudo – i
i terminalen for at få brugerrettigheder som root:
sudo -i apt-get install apache2 mysql-server phpmyadmin libapache2-mod-auth-mysql dvdauthor ntp ntp-simple gsfonts-x11 msttcorefonts tcsh ivtv-utils xmltv-util xmltv
Derefter for at installere ekstra fonte:
fc-cache -f –v
4. Teste TV-modtagelse
Ubuntu installerer alle drivere til mit Hauppauge PRV-250 af sig selv, så det er egentligt bare at loade driverne og teste at kortet kan ses at systemet:
Depmod
modprobe ivtv
dmesg
Gå lidt ned på listen for at se at kortet er fundet og virker OK. Fang nu et testbillede med:
cat /dev/video0 > /tmp/test.mpg
Tryk Ctrl+C for at stoppe capturing efter et minut. Afspil klippet i et vindue:
mplayer -vo xv /tmp/test.mpg
Hvis kortet virker ser man sne i vinduet.
5. Scanne TV-kanaler
TV-kanalerne skal findes og noteres sammen med de frekvenser de referer til. Først sender vi signalet fra TV-kortes udgang videre til indgangen på mplaver:
mplayer -vo xv /dev/video0
Nu åbner man et nyt terminal vindue og skriver følgende:
ivtv-tune -c23 -teurope-west -d /dev/video0
Parameteren –c er kanalnummeret. Start med at indsætte –c1 og gå frem til 60 eller hvor signalområdet nu ender. PS: Læg mærke til frekvensen når du får et signal igennem og sørg for at notere det. Det skal bruges senere.
På min gamle analoge hus antenne fik jeg følgende resultat:
23 er Kanal kbh på 487.250 MHz
31 er DR1 på 551.250 MHz
33 er STV2 på 567.250 MHz
43 er Stv1 på 647.250 MHz
47 er Sverige 4 på 679.250 MHz
50 er Sverige 4 på 703.250 MHz
53 er TV2 på 727.250 MHz
60 er kanal SBS N på 783.250 MHz
(DR2 mangler her)
6. Installere Mythtv-pakken
sudo -i
apt-get install mythtv mythbrowser mythdvd mythgallery mythmusic mythnews mythvideo mythweather mythweb mythtv-doc mytharchive mythControls mythgame mythvideo
7 . Ændre password for brugeren mythtv og tildele rettigheder
sudo -i
passwd mythtv
For nemheds skyld bruger jeg passwordet mythtv her. Undervejs får du denne besked:
Ubuntu MythTV packages generate a random MySQL password. The generated password for this machine is 'uertscvj'.
PS: Nogle guider anbefaler at man noterer og senere ændrer dette password til Mysql. Min erfaring er, at det skaber store problemer og i værste fald maler man sig op i et hjørne. MySQL og rettighedder er en bitch hvis man ”pille” ved. Rør det ikke med mindre du 100% ved hvad du gør. Brug derfor standardpasswordet indtil videre. Det er kun hvis man vil redigere vha. Phpadmin at passwordet skal bruges. I denne guide bruges i stedet Mythweb, som ikke behøver noget logon.
Nu skal brugeren mythtv tildeles administrator-rettigheder:
gksudo gedit /etc/group
Se efter linier, der starter med "admin", og tilføj ",mythtv". Log ud fra din nuværende X session og ind igen som brugeren mythtv med passwordet mythtv.
Vigtigt: Herfra og frem skal man IKKE åbne noget med sudo –i. Vi vil installere resten som mythtv brugeren.
8. Hente TV-lister fra nettet med XMLTV
Programmet xmltv bruges til at ”høste” data omkring tv-programmers starttid, indhold mv. Jeg vælger at hente hos tv2. Der er andre muligheder – prøv at Goggle emnet. Man skal starte med at oprette en konto hos tv2. Se på http://www.tv2.dk/ for detaljer. Husk at gemme password og logon – de skal bruges lidt senere.
Kør i terminalen:
tv_grab_dk --configure --config-file=tv2.xmltv
Indsæt brugernavn/password og svar Yes/No til de kanaler du skal bruge. Undgå at vælge ”all” med mindre du bruger ”hele pakken”. Der tager nemligen krig at hente data 6 dage frem for 60 kanaler;-). Xmltv vil nu henter alle titler og tider ned. Det kan tage så hav toldmodighed.
9. Mythtv Setup
Før mythtv-seup køres skal man sørge for at backend’en er stoppet. I terminalen køres:
/etc/init.d/mythtv-backend stop
Derefter:
Mythtv-setup
Nu dukker mythtv-setup utility’en op man man stepper sig igennem forskellige optioner:
General
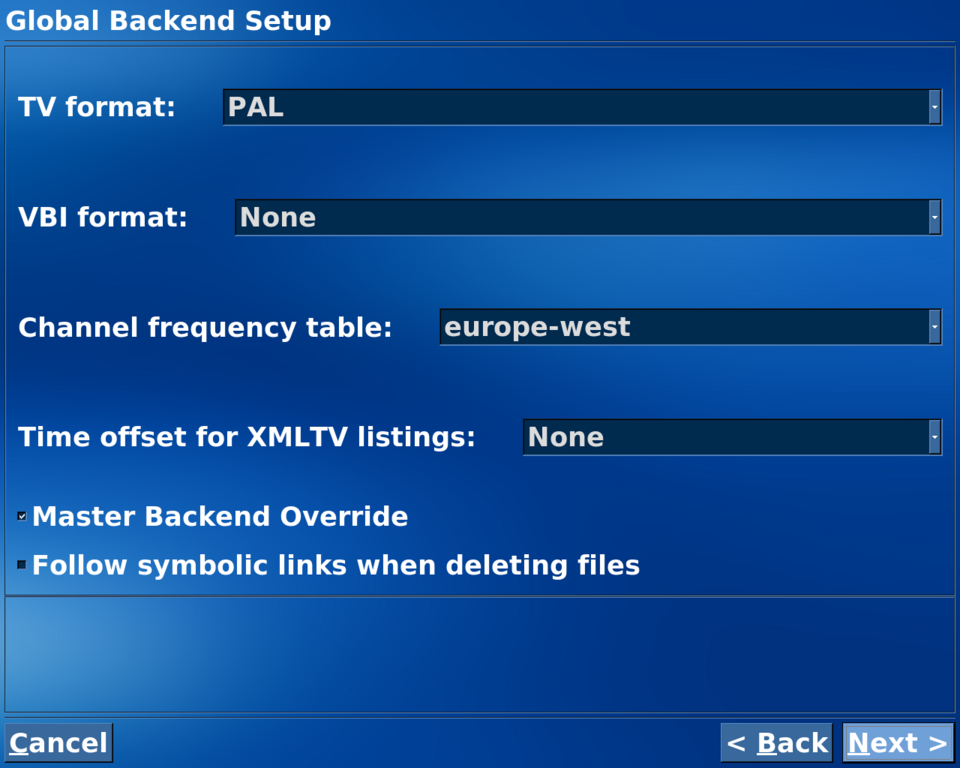
Capture Card

Video Source

Nu kommer det store tryllenummer. Når du trykker Finish dukker en tidslinie op som stopper ved 50%. Det tog mig en krig at regne ud, at man skal trykke alt+tab for at komme til terminalen( i de tidlige versioner var der ingen note om det på siden). Man fortsætter med at logge ind på tv2-siden og vælger de kanaler man skal bruge. Hav toldmodighed – det tager sin tid.
Input Connections
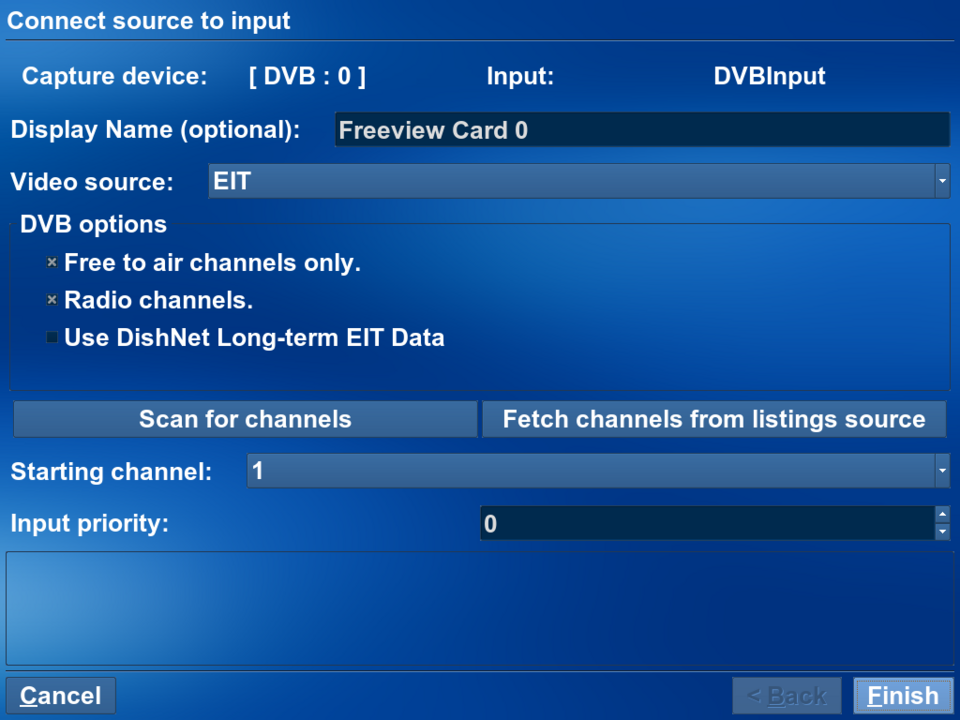
Tryk "Scan for channels" og vent. Hvis alt går vel vil du have en bunke kanaler at lege med..
Channel Listings
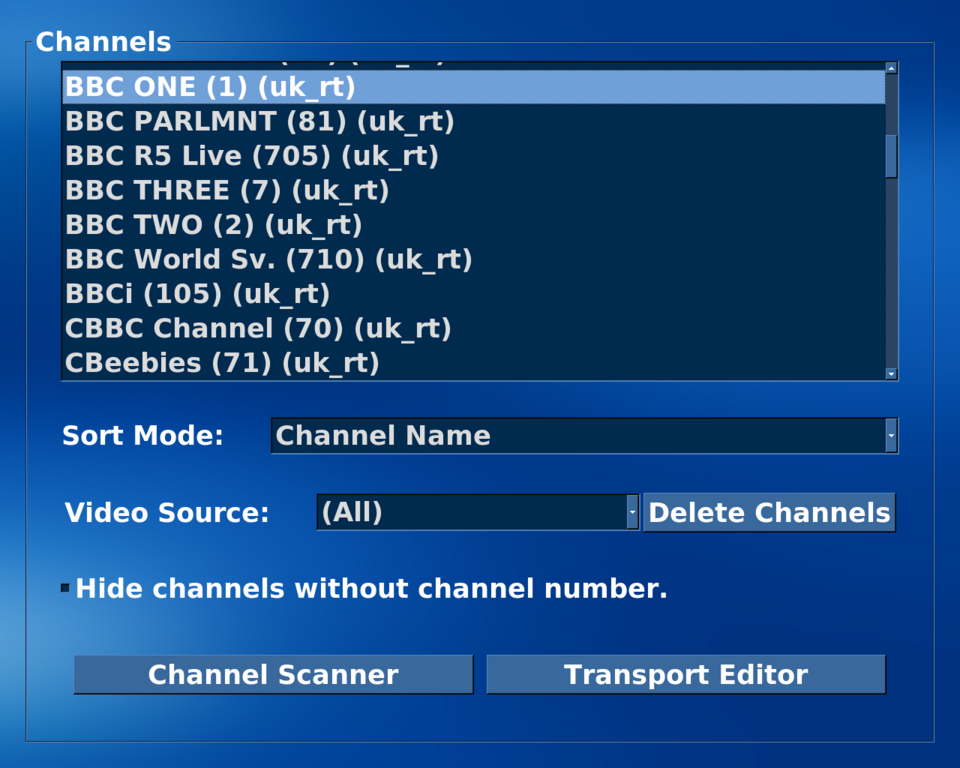
Test konfigutionen
Nu kan du forlade setup utility og starte backend’en. Bemærk at den vil starte automatisk når systemet er genstartet.
Sudo -i /etc/init.d/mythtv-backend start
Check for fejl beskeder:
tail -f /var/log/mythtv/mythbackend.log
Nu kører du frontend’en logget ind som mythtv user:
mythfrontend
Opdatere tv-lister i databasen
Kør:
Mythfilldatabase
Vent. Det tager tid
Plugins: henter diverse fra:
http://www.mythtv.org/modules.php?name=Downloads&d_op=viewdownload&cid=1Hvor skal de plugs ligge? lægger dem i home
Diverse: Fjerner sysmlyde og screensaver
The underlying authorization mechanism (sudo) does not allow you to run this program. Contact the system administrator.
Installerer temeaer:
Smid dem i /usr/share/mythtv/themes
Også Mythtv OSD "isthmus" skal med. Copy to /usr/share/mythtv/themes
to use it choose "isthmus" last page on Setup/Tv settings/Playback
I recomend "FreeSans" font, it looks much better.
Then, select "Retrieve Lineups", and within a short span of time (say 10 seconds or so) it should get the TV listings you configured over at your listing web site. It has been reported that this process stops, so you may have to Alt-Tab to the terminal and put in your username and password (for the listings grabber) again. Click the Finish Button, and hit ESC to get back to the main menu.
mythfilldatabase
..og så tester vi dyret:
mythbackend & mythfrontend
henter diverse fra:
http://www.mythtv.org/modules.php?name=Downloads&d_op=viewdownload&cid=1
Hvor skal de plugs ligge? lægger dem i home
Ændre placering af filer til /media/hdb5/videos osv:
change the permissions and ownership of the recordings directory:
*
sudo chown mythtv.mythtv /var/lib/mythtv
sudo chmod u=rwx,g=rwxs,o=rx /var/lib/mythtv
(This assumes that your directory for recordings is /var/lib/mythtv. If you have the recordings stored somewhere else, be sure to replace /var/lib/mythtv in the above command with that location.)
The end result is that the ownership and permissions should match /var/lib/mythtv as it was set by the installer. (You might want to replace /var/lib/mythtv with a symbolic link to your custom location if you are using a customized location.)
PS: Det var det her der virkede: chown -R mythtv.mythtv /media/hdb5/videos osv
Automatisk frontend start
Indstil X Windows til at starte automatisk ved boot. Rigtigt smart er det at vælge "timed login" - så har man nogle sekunder til at vælge at logge ind som administrator hvis noget er gået galt og skal rettes.
Først indsættes følgende i /etc/gdm/gdm.conf-custom file:
[daemon]
AutomaticLoginEnable=true
AutomaticLogin=mythtv
Derefter laves en fil kaldet .gnomerc i mythtv brugerens home folder og i den skrives:
touch /home/mythtv/.gnomerc
chmod 755 .gnomerc
Nu tilføjes denne linie:
sleep 10 && mythfrontend > /tmp/mythfrontend.log 2>&1 &
Alternativtil auto logon:
Hvis den først metode ikke virker så prøv den her, som bruger inittab til at logge ind som mythtv brugeren og starter X på een gang - uden at man behøver at lave en .bash_profile script.
Find denne linie i din /etc/inittab fil:
6:2345:respawn:/sbin/getty 38400 tty6
Udkommnter linien med #:
#6:2345:respawn:/sbin/getty 38400 tty6
Tilføj en ny linie lige under den du udkommenterede:
6:2345:respawn:/usr/bin/openvt -fwc 2 -- /bin/su - mythtv -c /usr/bin/startx >& /dev/null
Note: Man bør teste denne kommando for at checkke at mythtv brugeren har tilladelse til at starte X serveren. Hvis ikke det virker, så modificer din /etc/X11/Xwrapper.conf fil så den inkludere:
allowed_users=anybody
Note: Nogle vil foretrække denne metode, da den booter direkte i Mythtv uden at vise Ubuntus startbillede
EXTRAS:
Lydoptimering:
Brug
The 'MythFillEPG' Bash script
Alternativ Video Player
Prøv Xine med følgende parametre:
xine -r 4:3 -f -I --no-splash %s
ACPI Nedlukning & Opstart
Hvis dit bundkort tillader det, er det muligt for Mythtv at lukke automatisk ned når det ikke arbejder og vågne op igen når det skal optage en planlagt udsendelse. Én metode er at bruge den indbyggede ACPI Shutdown/Wakeup via RTC alarm funktionen.
Det første er at checke sine BIOS indstillinger. Se under en sub-menu af "Power Management" "APM", el. "Advanced”. Se efter Wake from RTC, Wake From Alarm, RTC Resume, etc. Note: På mange bundkort – med denne feature enabled – vil det vågne op efter en tid sat I BIOS’en og ikke fra en tid sat fra softwaren, som vi ønsker. Kan du ikke få det til at virke, så prøv at slå funktionen fra i BIOS.
Når du er i BIOS så se efter "ACPI Aware OS" og "ACPI 2.0" funktioner. Du har måske – måske ikke brug for disse. Min erfaring er at “ACPI Aware OS” skal være enabled og ACPI 2.0 lod til ikke at gøre nogen forskel. Sidste ting er at notere hvorvidt din hardware clock er sat til UTC eller local tid. Uret er på hovedsiden i BIOS. Hvis systemtiden (i 24 timers format) er det sammesom din lokaltid så er det ikke UTC (med mindre din lokale tidszone er GMT). Hvis Ubuntu er det eneste OS på dit system så er chancen for at tiden er gemt i UTC ret stor.
.
OS Funtion
Når ACPI er aktiveret skriver du:
$ dmesggrep -i acpi
Som vil give dig noget i retning af:
[17179569.184000] BIOS-e820: 000000003bfc0000 - 000000003bfce000 (ACPI data)
[17179569.184000] BIOS-e820: 000000003bfce000 - 000000003bff0000 (ACPI NVS)
[17179569.184000] ACPI: RSDP (v000 ACPIAM ) @ 0x000f9240
[17179569.184000] ACPI: RSDT (v001 A M I OEMRSDT 0x02000614 MSFT 0x00000097) @ 0x3bfc0000
[17179569.184000] ACPI: FADT (v002 A M I OEMFACP 0x02000614 MSFT 0x00000097) @ 0x3bfc0200
[17179569.184000] ACPI: MADT (v001 A M I OEMAPIC 0x02000614 MSFT 0x00000097) @ 0x3bfc0390
[17179569.184000] ACPI: MCFG (v001 A M I OEMMCFG 0x02000614 MSFT 0x00000097) @ 0x3bfc03f0
[17179569.184000] ACPI: OEMB (v001 A M I AMI_OEM 0x02000614 MSFT 0x00000097) @ 0x3bfce040
[17179569.184000] ACPI: DSDT (v001 761GX 761GX964 0x00000000 INTL 0x02002026) @ 0x00000000
[17179569.184000] ACPI: PM-Timer IO Port: 0x808
[17179569.184000] ACPI: Local APIC address 0xfee00000...
etc...
Næste ting er at checke RTC alarmen:
Hvis du skriver:
find /proc/acpi/alarm
Og du får dette retur:
/proc/acpi/alarm
..er alt OK. Hvis ikke, så skal ACPI support aktiveres i BIOS.
hwclock.sh
Dette script er hjertet i ACPI wake-up. hwclock.sh findes i /etc/init.d/ og læser hardware clock’en ved boot og kopierer det til “system tid”. Det kopierer også systemtid tilbage til hardware clock’en ved shutdown. På denne måde skulle hardware clock’en forblive præcis eftersom at system tiden bliver opdateret via NTP.
Mange boards “glemmer” RTC alarm tiden hvis der bliver skrevet til hardware clock’en efter at RTC alarm er sat.
For at komme rundt om dette skal der laves to modifikationer i hwclock.sh scriptet.
Fra dette punkt går jeg ud fra at man er i brugerens home-katalog og har sudo–rettigheder.
$ sudo cp /etc/init.d/hwclock.sh hwclock.sh.bak
Now, make two small additions to the existing hwclock.sh:
$ gksudo gedit /etc/init.d/hwclock.sh
At the head of the file, add the following line:
ACPITIME=`cat /proc/acpi/alarm`
The result looked like this for me:
... comments ...
HWCLOCKPARS=
ACPITIME=`cat /proc/acpi/alarm`
hwclocksh()
{
[ ! -x /sbin/hwclock ] && return 0
etc...
Next, scroll down to the tail of the file and look for:
# Updates the Hardware Clock with the System Clock time.
# This will *override* any changes made to the Hardware Clock.
#
# WARNING: If you disable this, any changes to the system
# clock will not be carried across reboots.
#
if [ "$HWCLOCKACCESS" != no ]; then
if [ "$GMT" = "-u" ]; then
GMT="--utc"
fi
/sbin/hwclock --systohc $GMT $HWCLOCKPARS $BADYEAR
fi
;;
You want to add this line:
echo "$ACPITIME" > /proc/acpi/alarm && sleep 1 && echo "$ACPITIME" > /proc/acpi/alarm
so that section of code now looks like this:
# Updates the Hardware Clock with the System Clock time.
# This will *override* any changes made to the Hardware Clock.
#
# WARNING: If you disable this, any changes to the system
# clock will not be carried across reboots.
#
if [ "$HWCLOCKACCESS" != no ]; then
if [ "$GMT" = "-u" ]; then
GMT="--utc"
fi
/sbin/hwclock --systohc $GMT $HWCLOCKPARS $BADYEAR
echo "$ACPITIME" > /proc/acpi/alarm && sleep 1 && echo "$ACPITIME" > /proc/acpi/alarm
fi
;;
Save the result.
This added command writes the wake time after the final clock change (the command directly above it).
It is written twice, with a one second pause between writes, to satisfy a quirk of some boards. Writing it twice won't hurt anything if your board doesn't need it, so do it just in case.
Clock Format
To correctly set the wake time, you need to know the format of your RTC alarm.
$ cat /proc/acpi/alarm
will return the RTC format. you should see something like:
2007-**-28 14:10:21
In this example, the format is yyyy-MM-dd hh:mm:ss- the ** may be the correct month, 00 or be blank on your system- having no settable month seems to be common.
First Test
Before you dig too much deeper into setting this up, it's a good idea to determine whether or not your board is going to comply. At this point, everything should be ready to test a wake-up. To do this, you will set the system to wake five minutes from now. If your computer is slower, you can increase the time; if faster, you can decrease it. Just make sure you allow for enough time for the system to shut down completely, with a minute or two to spare before it needs to wake.
The following command uses our example time format of yyyy-MM-dd hh:mm:ss and adds 5 minutes to the ACPI alarm. If your time format is different, you will need to adjust the ordering of +00-00-00 00:05:00 to comply.
$ sudo sh -c 'echo "+00-00-00 00:05:00" > /proc/acpi/alarm'
It is a good idea to check if the command did the job right.
If the year part looks like "0007" instead of "2007", change +00 with +2000; this worked for Acer Ferrari 3400 laptop and Asus M2NPV-VM motherboard...
$ cat /proc/acpi/alarm
Now you can shut down the system to see if it wakes up. Bookmark this page if you haven't already. I'll see you when you get back.
Shut it down:
$ sudo shutdown -h -P now
Sit back, relax and wait for your box to wake up...
Welcome Back!
Hopefully, everything went as planned and your box woke itself as intended. If not, double-check each step above to be sure it was all correctly done. If everything is correct, your board might need to reboot and complete a POST cycle before correctly waking, as some do. Skip ahead now to 3.0 Poweroff Kernel and try that remedy.
If you tried the poweroff kernel but still failed to wake, see 4.0 Troubleshooting.
If it did wake, CONGRATULATIONS! It's all downhill from here...
Scripts and Settings
You will likely need at least one of these scripts for the wake-up/shutdown process:
a script to adjust and set the wake-up time (if your mobo clock is UTC)
a Pre-shutdown script (possibly)
a Server Halt script (if you use poweroff kernel)
Examples of a wake script MythWakeSet, pre-shutdown script MythShutdownCheck and server halt script for poweroff kernel MythShutDown are provided here. If you need to do something special on your system before shutdown, such as special service shutdown scripts, etc., then you are responsible for integrating them into the provided script.
MythWakeSet
If your hardware clock is set to UTC, you need MythWakeSet to adjust between the wake time MythTV will report (local time) with the time the RTC alarm requires (UTC). If your hardware clock is set to local time, you don't need this script.
To create the wake script, open the editor of your choice and copy and paste the following. Save it as MythWakeSet:
#!/bin/bash
#
# MythWakeSet
#
# set mythtv wake-up time with UTC-adjusted time
#
# temp file for working with time
temp_stamp=/home/mythtv/timestamp
# store the wake time passed from mythbackend
echo $1\ $2 > $temp_stamp
# Read the date in *locale* time format and tag the time-zone info to the wake time
localeadd=$(/bin/date -f $temp_stamp +%F\ %T\ %z)
echo $localeadd > $temp_stamp
# adjust this to UTC and store the final wake time
utcadj=$(/bin/date -u -f $temp_stamp +%F\ %T)
# set the alarm
echo $utcadj > /proc/acpi/alarm
Now, make the script executable and put a copy of it in /usr/bin:
$ chmod +x MythWakeSet
$ sudo cp MythWakeSet /usr/bin
MythShutdownCheck
If you use your backend server for other things in addition to MythTV, such as ssh or ftp transfers etc., you want to make sure that MythTV doesn't shut down the system while you are in the middle of something. This is especially true if you have the backend set to a stingy idle timeout like 5 minutes.
One very effective way to do this is to check and see if another user is logged in, since you likely won't be transacting much non-mythtv business as the mythtv user. If you are not watching tv or a recording, but want the backend box to remain alive, all you need to do is log into an ssh session and leave it open.
You can do other checks in addition to- or instead of- checking for logged-in users: such as checking for specific running processes, etc. Add these checks to this script if needed, but first be sure to check that your changes work properly! Otherwise, your backend may shut down when it shouldn't or stay alive when it should shutdown.
If you want to make sure no other users are logged in before shutdown, copy and paste the following into an editor and save it as MythShutdownCheck; if not, skip ahead to 2.3.
#!/bin/bash
#
# MythShutdownCheck
#
# checks to see if any other user is
# logged in before idle shutdown
#
# returns "1" if yes, stopping shutdown
# returns "0" if ok to shutdown
#
if last head grep -q "pts/.*still logged in" # check for active *remote* login?
then
exit 1
else
exit 0
fi
Make the script executable and put a copy of it in /usr/bin:
$ chmod +x MythShutdownCheck
$ sudo cp MythShutdownCheck /usr/bin
mythtv-setup
At this stage, you have the needed scripts and the box woke successfully on test. Now it's time to setup Mythtv to test MythWakeSet.
Stop the server for needed changes and then run mythtv-setup:
$ sudo /etc/init.d/mythtv-backend stop
$ mythtv-setup
The settings you need are under 1. General, on page 5 (Shutdown/Wakeup Options). The settings you need are:
Idle timeout (secs): is how long the backend will wait in an idle state before wanting to shutdown. Normally, you would want this set to a reasonable amount between 300-1200 (5 to 20 minutes)- but to test it out, set it to 30 so you don't have to wait long.
Max wait for recording (min): determines whether or not the backend will shutdown if it is idle and there is a pending recording. e.g. if this is set to 20 minutes, the backend is idle and wants to shut down and the next recording is scheduled three hours in the future, the backend will shutdown and wake itsef up later. If the same conditions are true, but the recording is scheduled to start in 20 or fewer minutes, then it will wait, record it and then check this setting again after reaching an idle state . For now, set this to 1 to make sure it shuts down for our tests.
Startup before rec. (secs): is how much time the backend will allow for itself to fully boot and come up to speed, before being expected to record. Note that this time will be added as an offset to the wake time. You should likely allow at least 200 seconds or more to be sure you do not miss beginning of your recording. Set this to a reasonable estimate of your boot time for now, but time your boot from powerup for your final setting.
Wakeup time format: is the format your board expects for the RTC alarm (you checked this earlier). In this example, it is yyyy-MM-dd hh:mm:ss adjust yours as necesary.
Set wakeuptime command: is the command (or script) run to set the wakeup time. If you are using the UTC script above, enter: sudo /usr/bin/MythWakeSet $time This will call your script and pass it the waketime via the $time variable. If you are just using local time, you can enter sudo sh -c 'echo $time > /proc/acpi/alarm'
Server Halt Command: is the command that is executed to bring the whole thing down. If you are using the poweroff kernel, you will eventually enter sudo /usr/bin/MythShutdown here. For this test, enter: sudo /etc/init.d/mythtv-backend stop, which will only stop the backend.
Pre Shutdown check-command: is the shutdown checker- enter sudo /usr/bin/MythShutdownCheck to use it or enter exit 0 if not.
sudo
The last thing to do before testing is to take care of permission issues. As you probably noticed, the above commands run as "sudo", which would cause problems if it prompted for a password and nobody was there to enter it-- nothing would ever happen.
There are a number of ways to handle this- the method presented here gives the mythtv user sudo privileges, without prompting for a password, for limited commands and resources. There are other alternatives you can explore; each with their own advantages and pitfalls.
To give mythtv user the permissions we need:
$ sudo visudo
Add the following line to the end, making sure it is the only entry for mythtv- if another entry for mythtv exists, replace it with this one:
%mythtv ALL = NOPASSWD: /sbin/shutdown, /usr/bin/MythWakeSet, /proc/acpi/alarm, /usr/bin/MythShutdownCheck, /etc/init.d/mythtv-backend, /usr/bin/MythShutdown
NOTE: If you are using the poweroff kernel, use:
%mythtv ALL = NOPASSWD: /sbin/shutdown, /usr/bin/MythWakeSet, /proc/acpi/alarm, /usr/bin/MythShutdownCheck, /etc/init.d/mythtv-backend, /usr/bin/MythShutdown, /sbin/reboot, /sbin/grub-set-default
Another Test
Before proceeding, go into the frontend and schedule a recording an hour or so from now and note the time it starts.
Now we can test to see if the scripts and their interfaces with MythTV are set up correctly. First, set /proc/acpi alarm to a known value (again, if your date/time format is not yyyy-MM-dd hh:mm:ss, adjust as needed):
$ sudo sh -c 'echo "2007-12-12 12:12:12" > /proc/acpi/alarm'
Then, check to see it was set. You should see something simlar to:
$ cat /proc/acpi/alarm
2007-**-12 12:12:12
Now, fire up the backend to test the write to /proc/acpi/alarm. In this case, we won't lauch it as a daemon so we can see what is being logged:
$ mythbackend &
It should immediately start warning you of impending shutdown, count it down and then stop. Hit Enter to get a command prompt and then check to see if MythWakeSet worked:
$ cat /proc/acpi/alarm
2007-**-01 20:59:00
As the example shows, the time returned should now reflect the waketime and not all 12's, as we set before the test. Of course, yours will probably not match the example...
If your hardware clock is in UTC, to see if the waketime is set correctly:
Take the start time of the recording you set a little while ago (24 hour format), add or subract (as appropriate) for your time zone offset, and subtract the amount of time you set for Start before recording in step 2.3.
For example:
Recording was for 4pm (16:00:00)
Local time is GMT-5 +(05:00:00)
Start before rec was -(00:01:00)
Time with offset is 20:59:00
If MythWakeSet worked correctly, cat/proc/acpi/alarm should return something reasonably close to 20:59:00 for our example. If, after checking your math, yours still varies substantially or is unchanged from 12's, go back and review each step to check for errors. If you have the recording options in MythTV to wake a minute or two (or more) before the scheduled recording, this will also cause a small discrepancy.
The FINAL Test
The final and most important test is to put it all together for a full shutdown/wakeup.
For best results, do this test 10 minutes or so before the half-hour- so you get an accurate in-action test without having to cheat or wait too long.
Make sure the backend is shut down and go back into setup:
$ sudo killall mythbackend
$ mythtv-setup
Return to the Shutdown/Wakeup page and make the following changes:
Idle timeout (secs): 120Server Halt Command: sudo shutdown -h -P now
if you are using the poweroff kernel this will be: sudo /usr/bin/MythShutdown (see 3.1 MythShutdown)
And then start the backend:
$ sudo /etc/init.d/mythtv-backend start
In the frontend, find a show- on any tunable channel- that begins at the next half-hour and set it to record. Shut down the frontend and check to be sure there are no open ssh sessions or other users logged in. If this is a combined frontend/backend, log out of your current session.
Within two or so minutes, the backend should shut itself down.
Now is a good time to get a sandwich or a cold drink (or both!) and wait for it to turn itself on and boot up!
Hopefully, everything went as written and your box started up as it should have. If not, but you could successfully wake in step 1.4, check every step from 2.0 forward- it should be working properly. There's likely a small mistake somewhere.
When it wakes and records it should , all that is left for you to do is shutdown mythtv-backend, go back into mythtv-setup and make your final settings for Idle timeout, etc.
ENJOY!
MythWelcome
If you ran frontend and backend on the same machine, you can use MythWelcome to decide if the machine has been woken up by user and the start of the frontend is needed or not. With MythWelcome the Frontend is automatically started if you started the machine manually, but if its started automatically via acpi-wakeup the frontend won't start and look the backend from shutting down when recording is finished. Unfortunately MythWelcome is original build for using with nvram-wakeup, but you can also use it with nvram wakeup.
First you have to manipulate /usr/share/mythtv/startmythtv.sh to specify that mythwelcome is loaded in startup instead of loading the frontend directly. You can do this by starting an editor with
$ sudo nano /usr/share/mythtv/startmythtv.sh
Look for the last lines
#start mythtv frontend software
exec mythfrontend
and change it to
#start mythtv frontend software
#exec mythfrontend
sleep 5
exec mythwelcome
I need the sleep options because mythwelcome is faster than the backend, without this i get an error that the backend is not running. Restart
Modify MythWakeSet
Because MythWelcome uses a Unix timestamp to set the wakup time you need to modify the /usr/bin/MythWakeSet script. Open it via
sudo nano /usr/bin/MythWakeSet
and replace
# store the wake time passed from mythbackend
echo $1\ $2 > $temp_stamp
with
# store the wake time passed from mythbackend
##echo $1\ $2 > $temp_stamp
tmp=`echo $2 awk -F: '{print strftime("%Y-%m-%dT%T", $1)}'`
tmp1=`echo $tmp awk 'BEGIN { FS = "T" } { print $1 }'`
tmp2=`echo $tmp awk 'BEGIN { FS = "T" } { print $2 }'`
echo $tmp1\ $tmp2 > $temp_stamp
Configure MythWelcome
Exit the frontend, you will automaticaly get the mythwelcome screen. Press F11 to enter the setup and enter the following values: nvram-wakeup Command: sudo /usr/bin/MythWakeSetnvram-wakeup Restart Command leave blank!Command to reboot: sudo shutdown -h -r now leave the rest unchanged.
Configure MythBackend
Navigate to Shutdown/Wakeup Options and change the following values: Wakeup time format:: yyy-MM-ddThh:mm:ssSet wakeuptime Command: mythshutdown --setwakeup $timeServer halt Command: sudo shutdown -h -P nowPre Shutdown check-command: mythshutdown --check
Now test your configuration, but be aware that mythshutdown won't proceed if there is an recording less than 15 minutes away!
Poweroff Kernel
Before proceeding, try enabling/disabling (make it the opposite of what it is now) the Wake from RTC setting in BIOS, booting back into Ubuntu and attempting 1.4 First Test again. If it still fails after having tried adjusting BIOS settings, return any changed BIOS settings to their original state and try the following poweroff kernel remedy.
If you are not careful, these changes can hose your grub and booting could be an adventure. If have not edited your grub menu before or are not sure what you are doing, you should ask someone for assistance or google for grub editing information. PLEASE BACK UP YOUR menu.lst BEFORE MAKING THESE CHANGES!!!
So just back it up, cowboy...
$ sudo cp /boot/grub/menu.lst menu.lst.bak
The poweroff kernel's sole function is to shut the computer off- but it does so after rebooting and completing the reboot and POST cycle, which satisfies the quirks of some boards (including an older tested by the author).
To test if your motherboard might need a poweroff kernel, set a wake up time a few minutes in the future, restart the PC in the normal manner, but turn the PC off (by pressing the power button briefly, not by holding it down for a few seconds) after the POST but before Linux boots up. If the PC wakes up using this method, then the poweroff kernel should work for you. If it doesn't, this is not necessarily indicative of failure- at least one tested board failed this procedure but worked very well with the poweroff kernel.
First, install the poweroff kernel- download, unpack it and copy it to /boot:
$ wget http://prdownloads.sourceforge.net/nvram-wakeup/reboot-2004.10.03.tar.bz2?download
$ tar -xvjf reboot-2004.10.03.tar.bz2
$ sudo cp reboot-2004.10.03/bzImage.2.4.20.poweroff /boot
Next, edit the grub menu:
$ gksudo gedit /boot/grub/menu.lst
find the line at the head that reads:
default X
make note of the default number that is there (X) and then change it to:
default saved
This will cause grub to boot the last menu entry that was set (using grub-set-default, surprisingly). In this case, you will set the default value to the poweroff kernel. On reboot, grub will load, boot the poweroff kernel and shutdown.
Setting the default back to the "usual" kernel in the poweroff kernel menu entry ensures that when it wakes, it will boot into Ubuntu and MythTV as normal. The "usual" kernel is the X you just wrote down.
Append this entry to the end of your menu list:
title POWER OFF
savedefault X ### replace X with your default value from the step above ###
root (hd0,0) ##### this entry should match the ''root'' statement of your default kernel ####
kernel /boot/bzImage.2.4.20.poweroff root=/dev/null
Next, counting from 0, determine the menu entry for this poweroff kernel.
e.g. if you show one kernel, one recovery mode, one memtest and this kernel, the menu entry would be 3... if you have only a main kernel and this poweroff kernel, then it is 1, etc. Remember not to count any menu items that are commented out (with #).
Double-check the menu list to be sure you counted correctly!
Now you can test it out. Substitute value of poweroff kernel you determined above for P in the following and reboot:
$ sudo grub-set-default P
$ sudo reboot
Your computer should reboot, go through POST, load grub and then shut off.
When this works, you are ready to try a wake again-
$ sudo sh -c 'echo "+00-00-00 00:05:00" > /proc/acpi/alarm'
$ sudo grub-set-default P ## again, substitute "P" with poweroff value
$ sudo reboot
See you back at Step 1.5...
MythShutdown
If you are using the poweroff kernel, you will need this script to set the default grub selection and reboot. Copy and paste the following into an editor and save it as MythShutdown
#!/bin/bash
#
# MythShutdown
#
# saves the powerof kernel grub entry and reboots
#
sudo grub-set-default ''P'' ### replace "P" with the poweroff menu value from 3.0!
sudo reboot
Make it executable and copy it to /usr/bin:
$ chmod +x MythShutdown
$ sudo cp MythShutdown /usr/bin
Troubleshooting
Small mistakes are easy to make, so double and triple-check the things you have done.
If you were able to wake your board in step 1.4 (whether or not you are using the poweroff kernel), but you can't get MythTV to wake- chances are you made one or more small mistakes. Go back and check thoroughly.
If you were unable to get your board to wake for the test in step 1.4:
Try it again after changing the BIOS RTC wake setting to the opposite of what it is now
Try it with various combinations of BIOS settings for Power Management-type functions
Google, google, google...
Give your mobo manufacturer's technical support a call
Some motherboards will only wake from S3 (suspend), rather than from S4 (hibernate) or S5 (power off). If yours is one of these, you'll have to investigate suspending your PC instead of shutting it down.
Investigate other options- your board might be one that just won't wake with ACPI
Man, I Give Up!
If you have reached this stage, I'm sorry that ACPI wakeup did not work for your board.
To return things back to their original state:
$ sudo cp hwclock.sh.bak /etc/init.d/hwclock.sh
$ sudo cp menu.lst.bak /boot/grub
$ sudo rm MythWakeSet /usr/bin/MythWakeSet MythShutdownCheck /usr/bin/MythShutdownCheck MythShutdown /usr/bin/MythShutdown
To remove the backup system files:
$ sudo rm hwclock.sh.bak menu.lst.bak
If you aren't frustrated to the point of loathing shutdown/wakeup, you can investigate other wakeup options via google, the MythTV forums and our excellent Ubuntu forums.
Good Luck!